Wednesday, May 1, 2024

From Hat Stand to Head-Turning Beauty: Upcycling a Ceramic Vase

 Hi Everyone

Do you have a decorative item that's become more functional than stylish? 

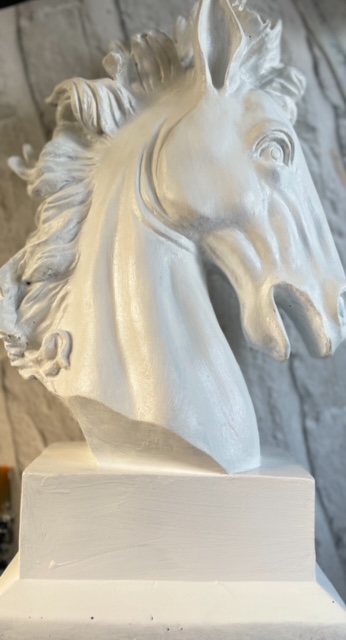
This was the case for a ceramic vase in my dining room. Originally a plant pot, it had been repurposed (by my husband!) as a rather unique hat stand. While it served its purpose, the dated "rust effect" finish left much to be desired.


Enter the power of upcycling!
 

I knew with a few simple techniques, I could transform this forgotten piece into a beautiful and functional accent for my home. In this blog post, I'll share the steps I took to upcycle this ceramic vase, giving it a whole new lease on life – perfect for those searching for DIY home décor ideas or upcycling inspiration.

Here's what you'll need:

Ready to get started? Let's upcycle!

Prepping the Canvas:

Before diving into the transformation, I made sure the vase was free of any dust or debris. A clean surface ensures the paint and other materials adhere properly.

Step 1: A Fresh Foundation:

For my base coat, I opted for a crisp white using Cadence Hybrid Acrylic Paint. This paint offered good coverage and a smooth texture, perfect for creating a clean canvas for the next steps. (Tip: You can substitute any white acrylic or chalk paint suitable for ceramic surfaces for this step)


Step 2: Rice Paper Decoupage for Textured Touches:

Next, I incorporated some visual interest! I focused on the upper portion of the vase, the "hair" area, and used rice paper decoupage. (Rice paper decoupage is a technique where decorative rice paper is adhered to a surface using decoupage glue) I applied decoupage glue to the desired area and carefully placed the rice paper, smoothing out any air bubbles. Patience is key here! Once applied, I let the decoupage dry completely.


Step 3: Unveiling the Crackle Effect:

This is where the magic happens! To achieve the aged and beautiful feel I wanted, I used Cadence Crackle Paste. This paste creates a stunning crackle effect on the painted surface.

  • I applied a layer of the Crackle Paste using a sponge dauber and a spatula onto the vase's surface in the areas where I wanted crackles and let it dry completely.


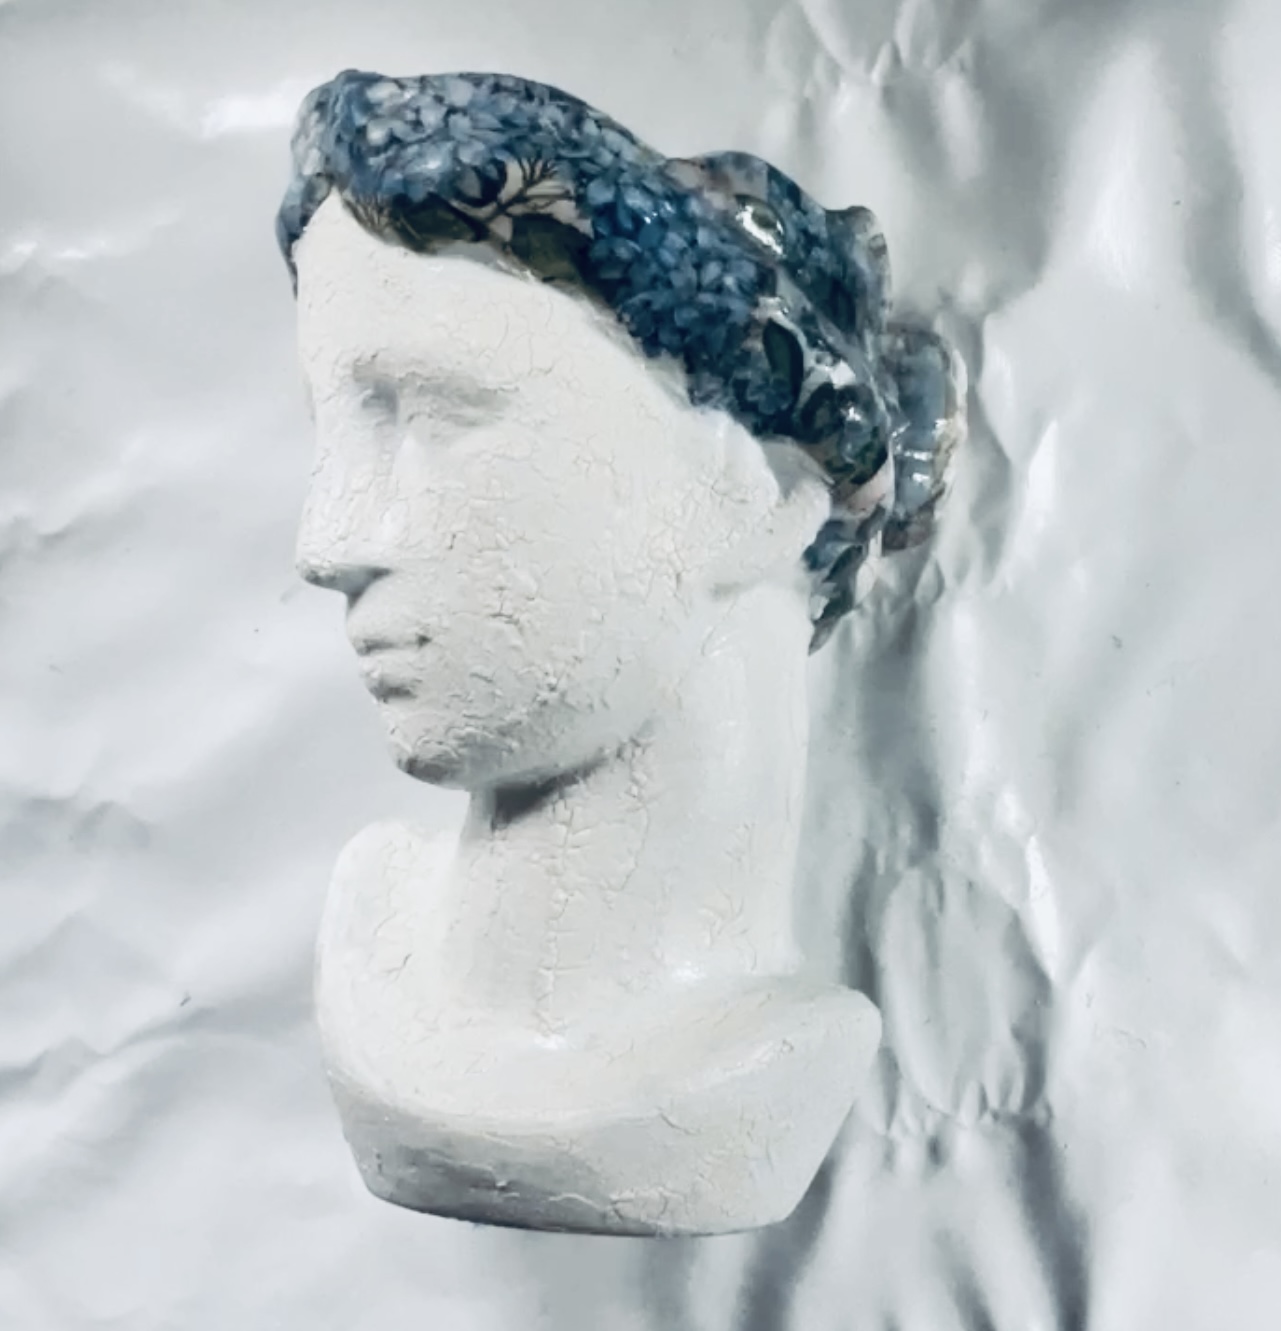
Step 4: Bringing the Cracks to Life:

Here's where the upcycle gets exciting! With the crackle effect now visible, I used a touch of blue oil paint to accentuate the cracks. I lightly brushed the oil paint across the surface and then buffed it with a cloth, allowing the paint to settle beautifully within the crackles. This step truly brings the aged effect to life!


Step 5: Sealing the Deal (and Adding Shine):

After the oil paint dried completely, I applied the finishing touch to the hair area – a coat of Aqua Stone Varnish (or any clear finishing varnish), as I wanted a highly glazed look, across this part of the vase. This step not only protects the decoupaged surface but also adds a lovely glazed finish that complements the overall look.

The Grand Reveal:

And voila! We have a transformed ceramic vase, no longer a dated hat stand but a beautiful and unique piece of home décor. The combination of the white base coat, the textured rice paper, and the crackled blue accents creates a captivating effect. The final gloss varnish adds a touch of sophistication while sealing the rice paper for lasting enjoyment.


This upcycled treasure not only adds a decorative element to my dining room but can still function as a hat stand, albeit a much more stylish one!

By following these steps and using readily available materials, you can transform forgotten items into something beautiful and functional. So grab your favourite paints, explore different techniques, and unleash your creativity on your next upcycling project!

Thanks

for 

Popping By

  • #diy
  • #diyproject
  • #repurpose
  • #repurposed
  • #creativeliving
  • #sustainableliving
  • #recycledcrafts
  • #thrifteddecor 
  • #crackleeffect
  • #ricepaperdecoupage
  • #decoupage
  • #upcycle
  • #upcycling 
  • #upcycledvase
  • Monday, April 22, 2024

    Upcycled and Fabulous: Creative Ideas to Decorate Your Old Jeans

    Hello everyone

    Have you ever ruined a pair of jeans with paint because you forgot to wear an apron while crafting? I know I have. In the past, I would have simply thrown them away and bought new ones. However, these days, I try to be more mindful of my wastefulness.

    Recently, while watching an episode of "The Great British Sewing Bee," I was reminded of the importance of reducing waste, particularly when it comes to denim. The show highlighted the issue of our society's throwaway culture with fashion and the impact it has on the environment. I was shocked to learn about the significant amount of water required to produce denim, from the cotton-growing process to the use of pesticides and fertilizers. This is why we need to upcycle our clothing more often and reduce our overall consumption of textiles. 

    Feeling totally reinvigorated and inspired by my incredibly talented friend Montse, from El Niu de L'Art, during a crafty visit to Barcelona, I decided to seize a pair of my paint-splattered jeans, along with my Cadence Fabric paints and pastes, to enjoy crafting a distinctive fashion statement.


    What was the first thing I did?

    I begin by washing my jeans without fabric softener, then drying and ironing them in preparation for adding paint and any other medium.  Now I am ready to start creating!

    I chose a variety of Cadence Style Matt Fabric paints and other Cadence fabric pastes to upcycle my jeans. To add some extra details, I selected a few stencil designs and incorporated a stunning foil transfer to make my jeans stand out even more.

    Now, let's start upcycling those old jeans!

    I focused on just one leg as a bold fashion statement, but you could certainly style both legs depending on how daring you feel!

    I designed the jeans by layering techniques. The initial layer was background shadow stencilling, which involves laying down one colour through a stencil, allowing it to dry, then slightly shifting the stencil to one side and applying a second colour to produce a subtle shadow effect.

    Next, I applied a stunning foil transfer to achieve that 'wow' effect. Next, I applied subtle streaks of colour with a paintbrush using Cadence HiLite paste, which added a slight sheen to the fabric.

    The next step creates an incredible texture that I adore! I used Cadence Textile Crackle Paste, which is a two-step process. I randomly applied Step One with a spatula over the leg of the jeans where I desired texture. After it dried, I applied Step Two in the same manner over the areas where I had used the first step. 

    Once it dried and the delightful crackles emerged, I applied slightly diluted fabric paints to add colour and depth to the textured areas.

    I built up layers by applying some paint freehand with my spatula. Next, I added colour and shading with fabric paints along the seams of the jeans. After the paints dried, I applied the finishing touch with Cadence Fabric Glitter Paste. I diluted a small amount of glitter paste with water and brushed it over the jeans design to give a subtle sparkle.  The final touch was adding a bit of stencil detail with Cadence Fashion Paste in silver. Voila! They are finished.

    So ditch the fast fashion cycle and unleash your creativity! With a little effort and these upcycling ideas, you can transform your old jeans, jackets, shirts etc, into unique, statement pieces that reflect your personal style.

    Don't forget to share your fabulous creations with us using #UpcycledAdventures on social media and inspire others to join the sustainable fashion movement!

    Stay tuned for more upcycled fashion inspiration coming soon!

    Thanks 

    for 

    Popping By

    If you liked my jeans and have been inspired then take a look below;

    🠟🠟🠟🠟


    El Niu de l'Art Online School: Unleash Your Inner Artist

    Calling all creative minds! El Niu de l'Art Online School caters to artists of all levels, offering beginner, intermediate, and advanced levels. This fantastic platform allows you to learn Montse's unique mixed-media and home décor techniques from the comfort of your own home, no matter your location.

    If you are interested please go to: https://www.patreon.com/laboratoriodeideas


    • #upcycledfashion
    • #diyfashion
    • #sustainablefashion
    • #ecofriendlyfashion
    • #refashion
    • #reworkedclothes
    • #upcycledclothing
    • #slowfashion
    • #ethicalfashion
    • #upcycledjeans
    • #diydenim
    • #decorateddenim
    • #upcycleddenim


    Saturday, April 20, 2024

    Barcelona's Creative Haven: Mixed Media Magic at El Niu de l'Art

    Hi Everyone

    An Artistic Escape in Barcelona: Crafting Magic, Inspiration, and El Niu de l'Art

    Recently, I embarked on a dream getaway to Barcelona – a haven for creative souls! My adventure centred around El Niu de l'Art, a haven unlike any other – my personal favourite shop dedicated to the mesmerizing world of mixed media art. Stepping into El Niu de l'Art is akin to stepping into a creative wonderland, filled with warmth and a sense of belonging.

    A Weekend of Mixed Media Delights

    The company couldn't have been better – a fantastic group of ladies and the incredible Montse, my friend and the mastermind behind El Niu de l'Art. Fueled by inspiration and Montse's infectious enthusiasm, the creative energy flowed freely throughout the weekend.

    The creative spark ignited during my Barcelona trip with El Niu de l'Art is still burning brightly! There's something truly special about a relaxed Saturday dedicated to upcycling, and today, I decided to embrace that magic.

    Why Upcycle Ornaments?

    • Sustainable Twist: Give pre-loved ornaments a new lease on life, reducing waste
    • Unleash Your Creativity: Experiment with different techniques and colours to create a one-of-a-kind piece that reflects your style.
    • Relax and Recharge: The calming process of upcycling is a perfect way to de-stress and disconnect from the digital world.
    • Budget-Friendly Fun: Transform a charity store find or forgotten ornament from your attic into a beautiful new decoration, saving money on store-bought pieces.

    So, armed with the inspiration gleaned from my weekend and the amazing techniques I learned from Montse, I unearthed a forgotten ornament from my craft stash. This neglected piece underwent a spectacular transformation. I love it, love it, love it!


    El Niu de l'Art Online School: Unleash Your Inner Artist

    Calling all creative minds! El Niu de l'Art Online School caters to artists of all levels, offering beginner, intermediate, and advanced levels. This fantastic platform allows you to learn Montse's unique mixed-media techniques from the comfort of your own home, no matter your location.

    While Montse's online courses are in Spanish, the beauty of the projects lies in their visual nature. We can still glean valuable inspiration from her videos! By focusing on the clear demonstrations and the listed products, we can translate the techniques into our own projects. If you are interested please go to: https://www.patreon.com/laboratoriodeideas

    Let's Get Social and Upcycle Together!

    The upcycled magic doesn't stop here! Follow along for more upcycling inspiration. I'd love to see your upcycled creations too! Share them on social media using the hashtag #UpcycledAdventures and inspire the creative community!

    Thanks

    for

    Popping By


    Tuesday, April 16, 2024

    DIY Handbag Makeover: Upcycle with Cadence Paints

    Hello Everyone,

    Today, I'm excited to share a fun upcycling project with you, which I hope will inspire you to try it out!

    Get ready to add a pop of colour to an old handbag with this easy DIY project!

    I recently organized my wardrobe into categories: keep, upcycle, donate, and beyond repair. From the latter, I salvaged buttons, buckles, and zippers for future projects. Deciding what to upcycle was challenging, but I opted to revamp an old green handbag with my Cadence leather paints, choosing metallic hues of champagne, gold, and copper - it turned out fabulous!

    Transforming an old, neglected item from the bottom of my wardrobe into a unique designer handbag was surprisingly simple, and I'm going to share how I accomplished it.

    Let's start designing our handbag makeover!

    I chose to use my Cadence Metallic Leather paints, along with various stencil designs, a soft paintbrush, a stencil brush, and a palette knife. 

    The initial step was to thoroughly clean my handbag and ensure it was completely dry before beginning.

    I used a soft brush to apply the paints randomly over the handbag's surface, gently merging the colours as I progressed. The paints were a pleasure to use, spreading and blending with ease. After achieving the desired effect, I used a hairdryer to dry the paints, preparing for the next step.

    Next, I applied stencil designs with black paint – this is the moment to unleash your creativity and transform an old bag into a personalised statement accessory!  

    I applied stencilling to both the front and back. I enjoy creating slightly different versions of the design on each side to provide myself with fashion styling choices.  

    I mixed a bit of water into the black paint and, with a fan brush, flicked droplets across the surface. Next, I used a palette knife to dab on the paint randomly, adding extra details.

    Voilà! Now you have your very own unique designer handbag!

    Upcycling a handbag with Cadence paints is a fun, affordable way to create a unique and stylish accessory. With a little creativity and these easy steps, you can transform your old bag into a piece you'll love to carry. So why not give it a try? 

    Thanks 

    for 

    Popping By

    #upcycledfashion #upcycledhandbag #DIY #sustainablefashion #sustainability #fashionideas #leatherpaints #mixedmedia #paintedbag #upcycledbag #diybag #cadencepaints #paintedleather #fabricpainting


    Monday, February 27, 2023

    Vintage Beauty Canvas with Cadence

    Hello and Welcome!

    I love to create using all my Cadence crafting goodies that I have in my crafting stash.  Today I am sharing a vintage style canvas project that I created for a recent Hobbymaker TV Cadence show.  I loved making this canvas with all its textured layers created using some of my favourite Cadence products.  I hope you like it!


    Vintage Canvas using Cadence paint and pastes by Mandy-Jane Crafts


    What I Did....
    • I used a stencil and white relief paste to create texture across the canvas base and dried it.
    • Next, I added some more texture using Cadence Vintage Legend with a palette knife to small areas of the canvas adding some around the outer edge and dried it
    • Then I took some small pieces of rice papers and glued them to canvas over the texture and dried.
    • Using Cadence Very Chalky Home Décor paint I painted the surface of the canvas blending in the edges of the rice papers. Dried.
    • Taking some of the Antiquing Powder in white and a very small amount of Dark Brown Hybrid paints from Cadence, I mixed them to create a soft light brown which I then blended around the outside edge of the canvas.  
      Once dried I diluted a little of the Dark Brown Hybrid paint with a little water.  I then dribbled this down the canvas edges dabbing away any excess with a baby wipe.  
    • The framed used was a pre-moulded white piece that I aged using a Dark Brown Hybrid wash.  Once dried I added some Antique Gold wax highlights.
    • The picture was taken from a sheet of rice paper, cut to fit frame, glued to white card and varnished with Cadence Aqua Stone Varnish.  When the varnish was dried I bent the card to crack the varnish.
    • The flowers were also from rice papers, glued to white card and cut out to use as embellishments.
    • The finishing touches were some splashes grey and white paint.

    What I Used


    I hope you like the project.

    Thanks for Popping By

    MJ :)

    Sunday, February 19, 2023

    Hello and Welcome To My New Blog page and My First Post!

    So Who Am I and Why a New Page

    Firstly, let me welcome you to my first blog post!  I am truly excited to be starting afresh and even more excited to be able to invite YOU to share in that excitement with me!  So, I am Mandy-Jane Taylor (but you can call me just plain old Mandy lol).  I have been wanting to refresh my blog for some time and at last I am doing it!  For my first post I wanted to let you know more about me and what you will see here!

    Let Me Introduce Myself

    I was born in England to a Welsh father and Scottish mother many, many, many years ago lol ...... but have lived in Wales for over 30 years.  It's an amazing place to live and I'm never leaving!!  I started out training as a Hairdresser working towards training to be a Tricologist. Then I met my husband, had my son and everything changed :)

    I've always enjoyed crafting whether it's with paint, paper or fabric but please don't ask me to crochet !!!!!!!!!  I have been so lucky that my passion turned into my job, first working for someone else in the craft industry and then together with my friend, into our own multi award winning shop before retiring from it.  I have worked as a Freelance Creative and Live On Air TV Guest Demonstrator for many years now and I still love it!!

    What is My Blog About

    For my first blog post I want to give you an idea of what you will see here!  You will see a cross mix of types of mixed media projects together with a mix of papercraft projects too!  I'm hoping to give you lots of inspiration, useful tips and great techniques sharing my favourite products with you.  I want this to be a fun creative outlet for you.  Being able to share ideas with you is exciting to me!

    Thank You....

    Lastly, thank you for taking the time to read my first blog post and I hope you will follow me and continue to join me in my new blogging adventure.  EXCITED!!!

    Thanks for Popping By 

    MJ xx

    From Hat Stand to Head-Turning Beauty: Upcycling a Ceramic Vase

      Hi Everyone Do you have a decorative item that's become more functional than stylish?   This was the case for a ceramic vase in my din...